Tuesday, February 25, 2020

PROGRESS

Here’s acrylic underpainting finished.
It’s super general and quick to get the ideas out and cover the white canvas.
I’ve already changed my mind on some color choices.
So glad I did the acrylic first to work out some thoughts.
Technical note - you can paint in matte acrylic first and then add oil,
But you cannot reverse the process. Acrylic cannot go over oil
doesn’t matter if the oils are matte or not. Just won’t work.
I started painting with oils yesterday and that’s another story!!###&&&$$
Thanks MB

Sunday, February 23, 2020

RABBIT OUT OF A HAT!

Surprise!
Here’s a first look - acrylic underpainting see notes below for 
technical explanation if interested. I covered the entire canvas today
I have to let the dust settle before I show that version.

Acrylic underpainting notes
I had to cover all that white and figure out the main colors at the same time.
I added Golden Fluid Matte Medium to the acrylic colors. 
The medium does not change the intensity of the colors it just helps the 
paint flow and adds a matte finish.
Acrylic can dry shiny and I wanted a matte surface for the oil to 
adhere to properly. I am happy with the results so far and if need be I can 
use Golden matte sealer before application of the oil paints.
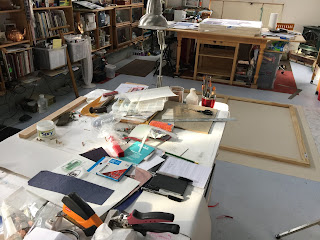
You can see all my reference photos on the table as well. 
I think I printed 15 photos to tape to the painting while working on that area. 
The next step is oil! Yikes! 
I’ll start at the top of the rabbit and work my way down. 
The sky will be the last thing painted - in theory.
Working on a ladder is a challenge in itself - I’ve fallen off once so far.
I’m used to stepping back to take a look but not while a couple of feet off the ground. 

Acrylic paints - I like Nova color the best. You can’t buy them in a store
you have to buy them direct from the factory in California. 
They’re pigment load is quite incredible and the colors are so clean.
I’m also using an old set of heavy bodied Golden acrylics.
If you have any questions about process you can always 
email me. I’d like to say I’m really excited about this 
project but it’s a bit overwhelming. Hoping that once I start painting
with oils that all my fears will evaporate.
Thanks for waiting and waiting and waiting MB


Friday, February 21, 2020

CANVAS INSPECTOR

Lulu seal of approval 

You can see some comparisons here. 
My typical size canvas boards on top of the new stretched canvas 
12 x 12 - 8 x 8 - 6 x 6 and 5 x 5
It’s a stretch - no pun intended

Finished canvas hanging on my wall. 
For scale - My wall is 8’ X 8’ - 2 full sheets of plywood.
I accomplished some sketching today but it’s not ready to show.
It’s going to be awhile, there’s more to figure out than anticipated.
It’s pretty intimidating to say the least.
All that white!!!
Later MB


Tuesday, February 18, 2020

HUGE PROJECT

This is the prep for a 60” X 72” commission 
I had to finish all my other paintings before I could make room for this large canvas.
I taped the studio floor to visualize the scale of the canvas.
You can see the frame leaning against the table.
This painting will be stretched, painted and then removed from the stretchers
to be rolled and shipped. 
Here’s the floor covered with fabric to protect the primed canvas from any grit or grime.
Here’s the frame sitting on top of the primed canvas. I had to decide how large the 
salvaged edge was going to be. I thought 4” was plenty but after looking at the frame
on the canvas I decided to add 5” to each side.
Since it’s going to be restretched I wanted to make sure there was enough material 
To accomplish that task.
Tomorrow the huge job of stretching the canvas. 
Here’s a look at my scary studio. Not a horizontal surface available.
So after stretching the canvas there’s going to be a lot of cleanup 
before I can get started.
This is going to be a slow process but I wanted to let 
you all know I’m busy.
Thanks for waiting MB